Published:
In Joomla! 3.0 the BootStrap development framework was added to the code base. BootStrap includes CSS for form formatting that give good looking results but it requires some HTML structures and classes that ChronoForms does not use. This FAQ includes a JavaScript snippet that can be applied to a form to use some parts of BootStrap.
For more information about BootStrap please see here.
I am continuing to develop this code little by little. You can see the latest version of my test form here. The latest addition is to include the ChronoForms 'Instructions for users' and Tooltip text into Bootstrap text input boxes. Please contact me if you want a copy of the current beta version of the script.
ChronoForms works well in Joomla 3.0 and the standard ChronoForms CSS is applied as you would expect. Here is an example from a test form with examples of different inputs. This is from a clean installation of Joomal 3.0 using the default Protostart template.
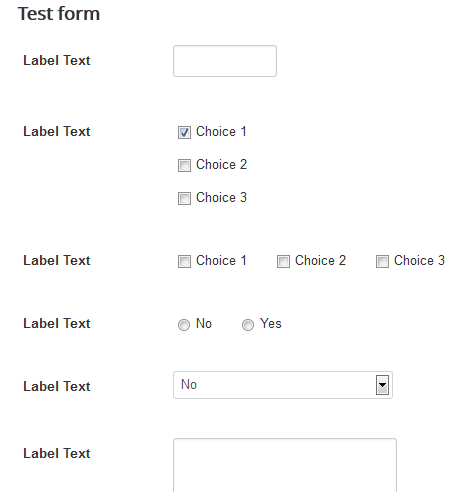
There are three main problems in getting the BootStrap styling to apply to the form:
- We need to remove the ChronoForms CSS - but not the JavaScript as that is used for form validation, etc.
- Joomla loads the Template CSS after the BootStrap CSS so the template over-rides the BootStrap formatting.
- With checkbox and radio groups ChronoForms has neither the correct class names, nor the correct HTML stucture to use the BootStrap CSS.
Here is the same form with the BootStrap CSS applied.
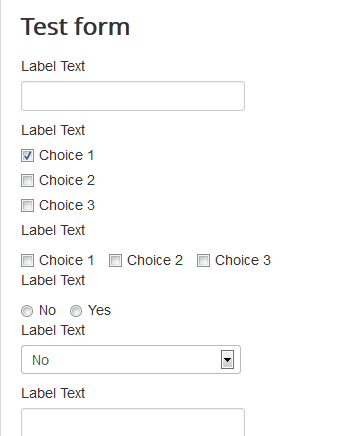
This is only a partial implemention of BootStrap. It covers the Basic Form Controls. Some other parts - like prepending and appending - can be used with Custom Element elements in your form; other - like input sizing - can be applied by applying classes to standard input elements.
Removing the ChronoForms CSS
This is the first part of the JavaScript we will use; it finds the ChronoForms CSS file in the page and removes it.
  frontforms_css = $$('link[href$="frontforms.css"]')[0];
  frontforms_css.setProperty('href', '');
Moving the BootStrap CSS
Just removing the ChronoForms CSS is not enough, the Protostar template loads it's own CSS after the BootStrap CSS and so over-rides it. The second part of the JavaScript deals with this by moving the BootStrap CSS after the template CSS:
  template_css = $$('link[href$="template.css"]')[0];
  bootstrap_css = new Element('link',
  {
    type: 'text/css',
    href: 'media/jui/css/bootstrap.min.css',
    rel: 'stylesheet'
  });
  bootstrap_css.inject(template_css, 'after');
Modifying the checkbox and radio button HTML
The final step here is to find all of the checkbox and radio button groups in the form and modify them:
- The inputs are moved inside the label tags
- The BootStrap classes are added
This snippet handles checkboxes, there is a similar block for radio buttons.
  var cbx_labels, cbx_for, cbx_input, cbx_float;
  cbx_labels  = $$('.cfdiv_checkboxgroup label');
  cbx_labels.each(function(item) {
    cbx_for = item.getProperty('for');
    if ( cbx_for ) {
      // this is a label for a checkbox
      if ( item.getParent().getParent().hasClass('radios_over') ) {
        item.addClass('checkbox');
      } else {
        item.addClass('checkbox inline');
      }
      cbx_input = $(cbx_for);
      cbx_input.inject(item, 'bottom');
    }
  });
The complete code
To use this add this code to a Load JS action in the On Load event of your form.
window.addEvent('domready', function(){
  var frontforms_css, template_css, bootstrap_css;
// remove ChronoForms CSS
  frontforms_css = $$('link[href$="frontforms.css"]')[0];
  frontforms_css.setProperty('href', '');
// move bootstrap.css
  template_css = $$('link[href$="template.css"]')[0];
  bootstrap_css = new Element('link',
  {
    type: 'text/css',
    href: 'media/jui/css/bootstrap.min.css',
    rel: 'stylesheet'
  });
  bootstrap_css.inject(template_css, 'after');
// update checkboxes
  var cbx_labels, cbx_for, cbx_input, cbx_float;
  cbx_labels  = $$('.cfdiv_checkboxgroup label');
  cbx_labels.each(function(item) {
    cbx_for = item.getProperty('for');
    if ( cbx_for ) {
      // this is a label for a checkbox
      if ( item.getParent().getParent().hasClass('radios_over') ) {
        item.addClass('checkbox');
      } else {
        item.addClass('checkbox inline');
      }
      cbx_input = $(cbx_for);
      cbx_input.inject(item, 'bottom');
    }
  });
// update radio buttons
  var rad_labels, rad_for, rad_input, rad_float;
  rad_labels  = $$('.cfdiv_radio label');
  rad_labels.each(function(item) {
    rad_for = item.getProperty('for');
    if ( rad_for ) {
      // this is a label for a radio
      item.addClass('radio inline');
      rad_input = $(rad_for);
      rad_input.inject(item, 'bottom');
    }
  });
  rad_float = $$('div[style*="float:left"]');
  rad_float.each(function(item) {
    item.setProperty('style', '');
  });
});
Adding attributes
Bootstrap supports a placeholder attribute which can be used to set a label inside an input. The Javascript in this FAQ will allow you to add the placeholder and other attributes using the Class box in a ChronoForms text Box element.


Comments