Published:
AWeber is a popular Email Messaging service; if you use it then it can be helpful to subscribe users directly from forms on your site. This tutorial outlines one way to do this from ChronoForms v4.
I found connecting to AWeber is more complicated than most similar services (a) because the documentation is difficult to understand and (b) because setting up the authorisation keys is not straightforward. Most of this tutorial will be taken up with that process.
AWeber uses the OAuth authentication process to identify external application (e.g. forms) that it will allow to connect to AWeber. Once you have the connection set up then you can write data to your AWeber records; and also read it if you need to.
Create an AWeber Developer account
The first step is to go to the AWeber Labs Getting Started page and create a developer account. Note: this is separate from any user account you or your client may have.
When you have the account set up, log in and Create a New App, probably this will be a private App. (Public Apps are used if you are going to sell or distribute the App, a private App is enough to connect a ChronoForm.)
When you have your App created you will see that you have an App ID, a Consumer Key and an Consumer Secret:
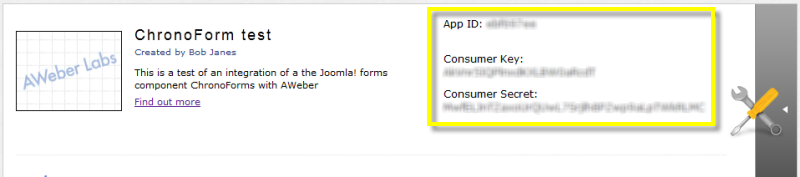
Make a note of these Keys as you will need them later.
Download the AWeber API library
AWeber provides a PHP library that enables ChronoForms to 'talk' to AWeber once an authorised connection is set up. You can get this library from GitHub here. Download the Zip Package, un-zip it and upload the aweber_api folder to your site. I put it into the components/com_chronoforms/extras folder. If you use another folder make sure that you change the paths in the code below.
Authorise the App in the client AWeber account
This is the most complicated step of this process. We need to set up a little temporary form called say aweber_auth that will attempt to connect to AWeber using our App ID and Keys. AWeber will show a logon screen which has to be completed using the Client AWeber username and password to approve the connection. Once this is done future connections can be automatically accepted.
Because AWeber needs to 'send back' a second set of keys to the form we need to make sure that we can accept this information. The simplest way to do this is to create a form and add a New Event called say 'aweber'. This avoids any possible problems with security checks on the standard On Load event.
Here is the code that needs to go into a Custom Code action in the new Event:
<?php
defined( '_JEXEC' ) or die( 'Restricted access' );

/**
 * This code is used to link the application to an AWeber account.
 * It needs to run in a separate form event that can accept a callback.
 * When run it will show an aWeber login form.
 * After a successful login the codes are available in a pair of new cookies.
 * 'accessToken' and 'accessTokenSecret'
 */
// include the aWeber classes
include JPATH_SITE.DS.'components'.DS.'com_chronoforms.DS.'extras'.DS.'aweber_api'.DS.'aweber_api.php';

// Replace with the keys of your application
// NEVER SHARE OR DISTRIBUTE YOUR APPLICATION'S KEYS!
$consumerKey        = "#Add_your_Consumer_Key_here#";
$consumerSecret     = "#####Add_your_Consumer_Secret_here#####";
$aweber = new AWeberAPI($consumerKey, $consumerSecret);

if ( empty($_COOKIE['accessToken']) ) {
    if ( empty($_GET['oauth_token']) ) {
        $callbackUrl = 'http://'.$_SERVER['HTTP_HOST'].$_SERVER['REQUEST_URI'];
        list($requestToken, $requestTokenSecret) = $aweber->getRequestToken($callbackUrl);
        setcookie('requestTokenSecret', $requestTokenSecret);
        setcookie('callbackUrl', $callbackUrl);
        header("Location: {$aweber->getAuthorizeUrl()}");
        exit();
    }

    $aweber->user->tokenSecret  = $_COOKIE['requestTokenSecret'];
    $aweber->user->requestToken = $_GET['oauth_token'];
    $aweber->user->verifier     = $_GET['oauth_verifier'];
    list($accessToken, $accessTokenSecret) = $aweber->getAccessToken();
    setcookie('accessToken', $accessToken);
    setcookie('accessTokenSecret', $accessTokenSecret);
    header('Location: '.$_COOKIE['callbackUrl']);
    exit();
}
?>
Note: this code is adapted from the AWeber tutorials and is messy but it works OK.
Next call this form in your browser by adding http://mydomain.com/index.php?option=com_chronoforms&chronoform=aweber_auth&event=aweber
You should see the Aweber login form. Login to the Client account to approve access from the App. This will link the two together.
If the login is successful there will be two cookies created in your browser called accessToken and accessTokenSecret; look for these and get their values. Keep a note of them safely.
NB I used the Edit This Cookie extension in Chrome to find these details; other browsers may have cookie editors built into their web developer tools.
We now have all the information necessary to connect a ChronoForm to AWeber. The temporary form can be unpublished or deleted.
Connecting a ChronoForm to AWeber
From here on we will be working with a 'normal' ChronoForm; the example will be a simple Contact form with 'name' and 'email' inputs.
Create the form as usual and add the necessary data validation and checking actions in the On Submit event. To link to AWeber we'll need to drag in a new Custom Code action after these actions.
We need one more piece of information from the client which is the name of the AWeber list that they want to add the form submissions to.
There are four main pieces of code that we need to add.
First we need to load the AWeber API library:
// this is file is from the AWeber Developer Lab
include JPATH_SITE.DS.'components'.DS.'com_chronoforms'.DS.'extras'.DS.'aweber_api'.DS.'aweber_api.php';
Second, to include our authorisation keys:
$consumerKey        = "#Add_your_Consumer_Key_here#";
	$consumerSecret     = "#####Add_your_Consumer_Secret_here#####";
	$accessToken        = "#Add_your_Access_Token_here#"
	$accessTokenSecret  = '#####Add_your_Access_Token_Secret_here#####';
	$list_name          = 'new_prospect'; // put the AWeber List Name here
Third to connect to AWeber:
$aweber = new AWeberAPI( $consumerKey, $consumerSecret );
	$account = $aweber->getAccount( $accessToken, $accessTokenSecret );
And lastly to connect to the list and add the new subscriber:
  $foundLists = $account->lists->find( array( 'name' => $list_name ) );

	  $list = $foundLists[0];

	  // create a subscriber
	  $params = array(
	    'email' => $form->data['email'],
	    'name'  => $form->data['name'];
);
	  $subscribers = $list->subscribers;
	  $new_subscriber = $subscribers->create( $params );
Note: more information about this code, how it works and other functions of the AWeber library can be found at the AWeber Labs site.
To put this all together and add some debugging code we get the whole code block like this:
<?php
defined( '_JEXEC' ) or die( 'Restricted access' );

// set $debug = true to generate diagnostic output<
$debug = false;

// this is file is from the AWeber Developer Lab
include JPATH_SITE.DS.'components'.DS.'com_chronoforms'.DS.'extras'.DS.'aweber_api'.DS.'aweber_api.php';

// Replace with the keys of your application
// NEVER SHARE OR DISTRIBUTE YOUR APPLICATIONS'S KEYS!
$consumerKey        = "#Add_your_Consumer_Key_here#";
$consumerSecret     = "#####Add_your_Consumer_Secret_here#####";
$accessToken        = "#Add_your_Access_Token_here#"
$accessTokenSecret  = '#####Add_your_Access_Token_Secret_here#####';
$list_name          = 'new_prospect'; // put the AWeber List Name here

$aweber = new AWeberAPI( $consumerKey, $consumerSecret );
$account = $aweber->getAccount( $accessToken, $accessTokenSecret );

// set this to true to view the actual api request and response
if ( $debug ) $aweber->adapter->debug = true;

try {
  // get the list object for the named list
  $foundLists = $account->lists->find( array( 'name' => $list_name ) );
  $list = $foundLists[0];

  // create a subscriber
  $params = array(
    'email' => $form->data['email'],
    'name'  => $form->data['name'
  );
  $subscribers = $list->subscribers;
  $new_subscriber = $subscribers->create( $params );
  // success!
  if ( $debug ) print "A new subscriber was added to the $list->name list!";
} catch( AWeberAPIException $exc ) {
  if ( $debug ) {
     print "<h3>AWeberAPIException:</h3>";
     print " <li> Type: $exc->type              <br>";
     print " <li> Msg : $exc->message           <br>";
     print " <li> Docs: $exc->documentation_url <br>";
     print "<hr>";
  }
}
?>
All that remains is to test and debug in your site.
Note: you don't technically need to have access to the Client AWeber account to implement this but it make testing and debugging much simpler if you do.


Comments