Sometimes it is useful to be able to ask the user to review and confirm the form data they have input before it is finally submitted. ChronoForms v4 has a Confirmation Page action that can help you do this.
For ChronoForms v4 only
To use the Confirmation Page action drag a copy from the Advanced actions group into the On Submit event of your form. It should be moved up to be after any anti-spam or validation actions but before any actions that process the form data after it is submitted.
There are two steps to configuring the action: to add the necessary actions to the form sub events; and completing the action options.
Add actions to the sub events
The action has three sub events:
-
On Show: where you add actions to run when the Confirmation Page is displayed
-
On Confirm: where you add actions to run when the user confirms submission.
-
On Back: where you add actions to re-display the form for editing.
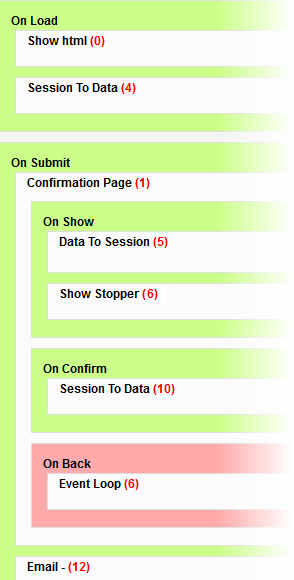
On Show
When the confirmation page is show the data isn't editable so we need to keep a copy to use later when the form is edited or submitted. To do this drag a 'Data to Session' action from the Data / DB Operations group into this event. This action saves a copy of the form data into the Users Session - a Joomla! data store that is kept while the user stays on the site.
As the las action here please drag in a Show Stopper action from the Core actions group to stop any further processing when the confirmation page is shown.
On Confirm
We need to re-load the form data here so that ChronoForms can process it. Drag a 'Session to Data' action into this event.
In general avoid adding other actions here. If you need Email, DB Save or other actions add them to the On Submit event after the Confirmation Page action.
On Back
We need to add an Event Loop action here to re-display the form for editing.
To make the data available we also need to add a 'Session to Data' action to the form On Load event and move it up before the Show HTML action. This will re-load the data saved by the 'Data to Session' action in the On Show event.
Completing the action options
If you open the action you will see just two options:
Enable buttons
Unless you need to add your own buttons leave this set to Yes.
Note: the button names here are not translateable by the ChronoForms Multi-Language actions so some extra work is needed if you need to change the button text.
Page Code
The Page Code option box is where you enter the HTML to display the content of the Confirmation Page. ChronoForms will not do this for you automatically, if you leave this box empty your confirmation page will be empty.
You can add any HTML here using {input_name} where you want to include values from the form data.
A quick way to get a simple confimation page HTML layout is to copy and paste an Email template if you have one. If you don't have one, you can add an Email action to your form, click the Generate Auto Template link on the Template tab, copy and paste the template code, then delete the Email action again.
If your confirmation page layout is more complex - for example if some parts are displayed conditionally on other form results - then you can also use PHP here. In PHP you should use $form->data['input_name'] to include form data.


Comments: