ChronoForms v5 has added a new Multiplier Container option that lets you set up a group of elements with a 'Plus' button that lets the user add an extra copy of the group into the form. This FAQ explains some of the ways to use it.
This FAQ is based on a form developed for a client which allows the user to add Tshirts of different types and colours to an order form.
Please note that the default Chronoforms5 installer has a demo form named "demo-fields-multiplier" which you can check to understand how the multiplier is setup, and how to use the "repeater" syntax to print the multiplier fields values in the email or the thanks message actions.
Setting up a Multiplier
On the form Designer tab open the Advanced elements group and drag a container into the right hand block. Now drag a second container inside the first one.
Edit the first - outer - container and set the Type to Multiplier. Give the container a name and id. For the id we'll use shirt_multiplier which will let us identify this group of elements using JavaScript later on.
Edit the second - inner - container and set the Type to Multiplier Contents.
Drag the elements that you want to have in the multipler into the inner container. To get a good looking form I suggest that you use the Multi Field element from the Advanced elements tab for this. Note that you can't remove elements from a Multi Field element or change their order so a little planning may be useful. We will use three drop-downs in this FAQ: shirt type, size and colour; and, at the end, a Custom Code element we will add some code to later.
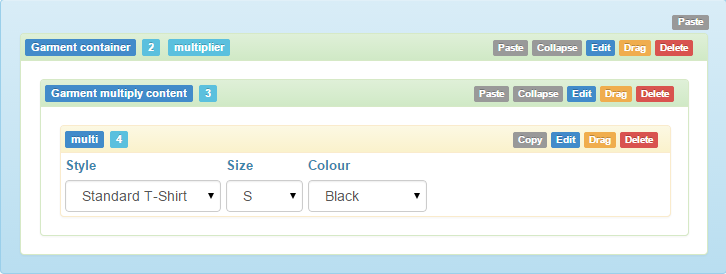
Configure the drop-down element - set the Label position to Top and set the Custom Code element to Pure Code and add some options. The result should look something like this:
If you now add an HTML (Render Form) action to the form On Load event in the Setup tab you can save and test your form. You will find that the red 'delete' row button shows up under the row which is not very tidy. Add a Load CSS action with CSS like this to move it to the top right of the row:
.gbs3 .multiplier-contents {
  background: none repeat scroll 0 0 #eee;
  margin-bottom: 6px;
  padding: 6px;
  position: relative;
}
.gbs3 .multiplier-remove-button {
  position: absolute;
  right: 12px;
  top: 12px;
}
The result in the front-end should look something like this, with a neat repeating shirt selector.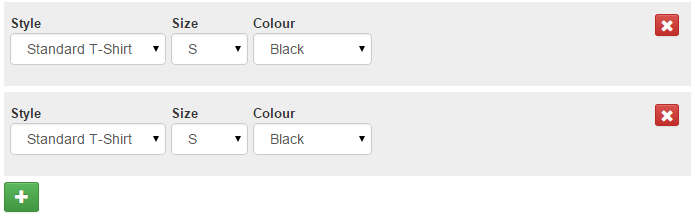
The CSS may not work with all templates, it was tested on the Joomla 3 Protostar template.
Configure the multiplier
Each new row in the form needs to have it's own distinct name and id so that we get all the data returned when the form is submitted.
There are some settings in the outer, Multiplier container to help us do that. Open the settings and click the Multipler tab. The settings I have used are:
Replacer
This is a string that will be replaced in each new row with the latest Counter setting. The default is 0 - I strongly recommend that you change this as using 0 can have some unexpected side effects. I used ## as that is clear and unlikely to be used except where I add it.
Counter
This is an integer that will be increased for each new row and used to replace the 'Replacer' string. I used 1.
Hide First
The first element will have ## as the counter so I want to hide it - set this to Yes.
Disable First
And this to Yes too - that way it will not cause any problems with validation.
Hide Buttons
This option plus the following one lets you add a fixed number of rows to the form, we want the user to add rows so leave this as No.
Start Count
Leave this as 1
Data Path
This sets a sub-array in the $form->data array that will be checked for existing multiplier data will be saved. I have used shirt.
Setting element names and ids
We now need to go back and set up the names and ids for the elements in the multiplier. The simplest way to do this would just be to add the Replacer string to a standard name e.g. style_## - with that our form results would include style_1, style_2, . . . etc. That will work but leaves us with some work to do to link up the matching style, size and colour for each shirt. Using array names will make that easier e.g. style[##] but that still groups all the styles together.
[style] => Array( [1] => 1, [2] => 3 )
[size]  => Array( [1] => M, [2] => S )
[color] => Array( [1] => Hot Pink, [2] => Purple )
Better is to use shirt[##][style], shirt[##][size] and shirt[##][colour]. This will group each shirt together and assing the shirt sub-array which is probably the most useful arrangement.
[shirt] => Array(
  [1] => Array( [style] => 3, [size] => L, [colour] => Dark Grey )
  [2] => Array( [style] => 1, [size] => M, [colour] => Green )
)
We can't use arrays for ids so those become shirt_##_style, shirt_##_size and shirt_##_colour
That should give you a working form that will collect and Submit shirt data for as many shirts as the User chooses to add.
Hiding the repeated labels
A user asked for an added feature to hide the labels after the first row. This may be added in a future release but for the moment I found a way to do that with CSS in a Load CSS action:
/* Hide all the labels */
div.multiplier-contents label {
  display: none !important;
}
/* unhide the labels on the second row - the first visible one */
div.multiplier-contents:nth-child(2) label {
  display: block !important;
}
/* reduce the bottom margin to tighten up the rows */
.gbs3 .form-group {
  margin-bottom: 3px !important;
}
Note: this may need to be modified to work with your site and templates.
Working with JavaScript
If we can add JavaScript to work with the multiplier then we can have more control over the way the form works. To do this we need to be able to add event handlers to the form elements after the user clicks the 'Add one' button. There is no direct call in the multipler script but we can do it by adding an On Click event to the button and delaying the function long enough for the new row to be added. Here's a way to do that:
jQuery(document).ready(function(jQ) {
  jQ('#shirt_multiplier .multiplier-add-button').click(delayUpdate);
  function delayUpdate(){
    setTimeout(someFunction, 500);
  }
});
Saving the data to a database table
Printing the multiplier fields data
Assuming your debug data shows the fields data in the format below (this depends on how you named your fields):
[text] => Array
        (
            [0] => Array
                (
                    [data] => test 1
                )

            [1] => Array
                (
                    [data] => test 2
                )

        )
Then you can use a code like the following to print the value of this field in your email/thanks message:
{repeater:text}
{data}
{/repeater}


Comments: