Published on
In the last tutorial we created a form which saves some form data into a database table, but what if we want to load record data from that table into our form? Let's see how this can be done:
This FAQ is based on the downloadable PDF tutorial written by Max here.
- We are going to use the same form which we used in our last tutorial for the DB Save action. Open the form for editing in the Wizard using the “Wizard edit” link in the Forms Manager.
-
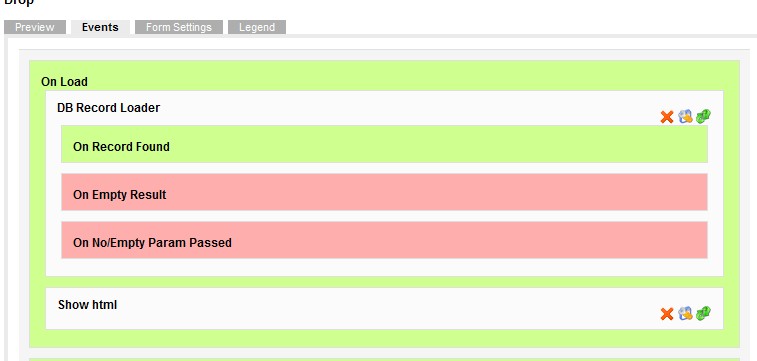
Drag a 'DB Record Loader' action to the 'On Load' Event of the form, make sure its placed before the 'Show HTML' action.

- Next let's configure the new DB Record Loader action.
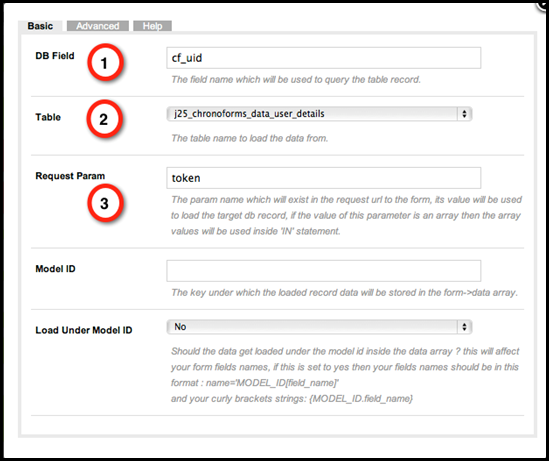
- First, we need to decide how are we going to load the record from the database table. In this tutorial we are going to pass the value of the cf_uid field into the form URL to load the corresponding record from the table, since the cf_uid is unique for each record then this should be OK. So write cf_uid in the DB Field option box, then let's select our table (either the same table as the previous tutorial or whichever table the data is stored in).
- We assume in this example that we are going to pass the cf_uid field value to the form URL. We need to identify which parameter name we will use to pass the field value. We’ll call it token. Here is how it will look in the URL when supplied:
-
index.php?option=com_chronoforms&chronoform=user_details&token=ff2119500f1a4ec2318c210bf681b0fe -
To get the data into our form, set up the DB Record Loader | Basic fields as shown in the figure below. Note that we are using the cf_uid field values to load a record into the form, and we will supply that value in the URL. column names exactly or the data sill not be loaded correctly.

-
In the image:
- DB Field is where we identify which database table column to use for the record lookup. In our case, we will use the cf_uid column.
- Table is where we identify which table in our database we will be looking into for the record matching the cf_uid value.
-
Request Param is the name we will use in the URL to specify the value to use in the database record lookup.
- Although there are other settings to configure, they are not needed now. You can use the WHERE box to write a custom query that is more flexible than using a single DB Field and value pair. The Model ID settings can be helpful when loading data from multiple tables into one form with different field names, and so on. For now, just set your form the way you see in the figure above.
- Click “Apply” and then close the popup and click “Save”. Now, if you select the Frontend View option, your URL will look something like this. Notice that it ends with the form name (user_details in this example), and “token” does not appear in it at all.
-
http://example.com/index.php?option=com_chronoforms&chronoform=user_details
-
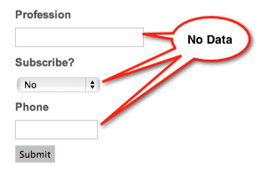
Let’s test our form as usual, using the default URL (without the token param). It should be empty as before.

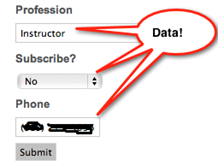
- To get the data record into the form, append the URL with the token value using the text &token= followed by the cf_uid value of the record.
-
http://example.com/index.php?option=com_chronoforms&chronoform=user_details&token=ff2119500f1a4ec2318c210bf681b0fe
-
Now we see the data !!

- What if I clicked the submit button now? What would happen?
- A new database record would be created, but of course we usuaully want to update the loaded record. To do this go back to the Wizard Edit and drag a “Hidden field” to your form Preview box and edit its name to cf_id which is the 'Primary Key' of the connected table. Then the loaded record will be updated when the form is submitted instead of creating a new one.
Note that you can use the loaded data in many ways in your form. Please see this FAQ for more information.
In this example the record identifier was passed in a URL; you could also pass it from another form; from data saved in the User session; in a Cookie from a previous visit; or from the current User ID if you wish to.
Thanks to user GardinerJ for improved text and images for a large part of this tutorial


Comments: